Show me a how-to walkthru in the app
How to: Add/remove Division Access
How to: Move a Division Member
How to: Move a Division Member with Their Documents
How to: Make a Division Admin
How to: Add/remove Division Access
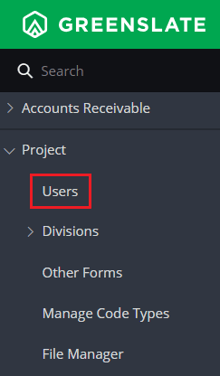
Step 1: Under Project, click USERS.
Step 2: Locate the employee whose division(s) you wish to update, then click the Division Member cell for their row.

Step 3: In the Divisions field, search for and add division(s) from the drop-down list, or click the X to remove existing division access.

Step 4: Review your changes, then click SAVE.

How to: Move a Division Member
Step 1: Under Project, click USERS.

Step 2: Locate the employee who you wish to move, then click the Division Member cell for their row.
Step 3: In the Divisions field, add the destination division and click the X to remove existing division access.

Step 4: Click SAVE.
Tip! If division admins/department heads of divisions are not configured, approval flow steps that require division admin or department head approval may be delayed.
If you encounter approval issues, and your division admins/department heads are not yet assigned or invited, please reach out to digitalsuccess@greenslate.com to implement one of the workarounds below.
Potential Solutions:
- Make step skippable until department heads are hired.
- Make step not required for parent division and all documents submitted there until department heads are hired.
- Give another accounting team member access to approve for all divisions temporarily.
How to: Move a Division Member with Their Documents
Step 1: Under Divisions, click MEMBERS.

Step 2: Search for the employee and click on the number of documents.

If an employee has pending documents or transactions, they must be fully approved/completed to move them.
Step 3: Select all the documents by clicking the check box at the top of the column then click MOVE. Then select the new division in the drop-down menu and click CONFIRM.


Tip! If the employee has many documents select 100 in the Items per page drop down menu to expand the list and select all the documents. If the employee has more than 100 go to the next page to move them.
How to: Make a Division Admin
Step 1: Under Project, click USERS.

Step 2: Locate the employee to promote to admin, then click the Division Admin cell for their row.

Step 3: Select the Division then click SAVE.
