GreenSlate Prepaid Visa Cards are provided in partnership with PEX.
Options for Uploading GreenSlate Prepaid Visa Card Transactions:
1. Use an automated daily import of transactions to create Envelopes in our application
2. Copy/Paste with Entry Window Template
3) Manually upload your transactions
1) GreenSlate is importing your transactions for you.
NOTE: this is the default configuration for GreenSlate clients using the prepaid Visa Cards
Show me a how-to walkthru in the app
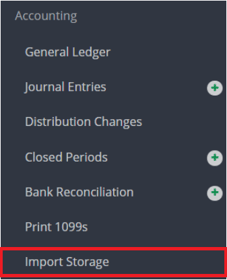
Step 1: Click IMPORT STORAGE on the left navigation.

Step 2: Click EDIT.

Step 3: Make any necessary coding changes.

NOTE: You may use the select column to mass-update coding.
Step 4: Click SUBMIT.
.csv%20-%20Excel.png?width=688&height=147&name=2021-05-09%2020_07_20-Template%20(12).csv%20-%20Excel.png)
When you create your envelope, the list of unused transactions will appear to be brought into a new PCard Envelope. You may follow the instructions from this article to complete the process: How to: Submit a Prepaid Card Envelope
NOTE: When using PEX, and auto-imported transactions, funding transactions will auto-import into GreenSlate, and appear from General Ledger screen, as unposted transactions. Once posted, the CP Custodian is credited, and the CP Account is debited.
2) If you are using the Entry Window Template for Copy/Paste:
You must request of GreenSlate Support that the Auto-imported transactions, and auto-reconciliation features be disabled, as they may be enabled, by default.
Step 1: Copy and paste data from envelopes exported from PEX CSV file to our GreenSlate Entry Window Template.
Step 2: Select All from the excel file, and COPY.
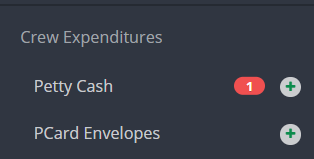
Step 3: Click the + to the right of PCard Envelopes on the left navigation.

Step 3: Select the PEX vendor from the Cards drop down menu and click SUBMIT.

Step 4: Within the envelope, in the Details area, click PASTE. Your copied transactions should appear as detail lines.

Step 5: Enter an envelope # or check the box to auto generate and enter a description.
.csv%20-%20Excel.png?width=688&height=183&name=2021-05-09%2019_57_27-Template%20(12).csv%20-%20Excel.png)
Step 6: (Optional) If you wish to indicate, replenishment of the prepaid card account balance, any replenishment amount, OR the total of the detail lines may be added in the Reimburse Amount field. This will create a credit and a debit line automatically to move funds back to the PEX vendor's account. With PEX, funding transactions happen manually when auto-imported transactions are disabled, so replenishment of cards is a manual process, and this method is one way to accomplish this.
.csv%20-%20Excel.png?width=688&height=439&name=2021-05-09%2019_59_44-Template%20(12).csv%20-%20Excel.png)
Step 7: Add notes and upload files as needed.
PRO TIP: In the Envelope FILES area, upload a PDF version of your PEX Envelope, so it may be virtually paperclipped to this transaction's PDF in GreenSlate!

Step 8: Click SUBMIT.

Info on the entry window template can be found here: Copy/Paste with Entry Window Template
3) If you are uploading your PEX transactions manually:
Step 1: Complete and upload the template of transactions to Import Storage.
Step 2: Click the + to the right of PCard Envelopes on the left navigation.

Step 3: Select the PEX vendor from the Cards drop down menu and click SUBMIT.

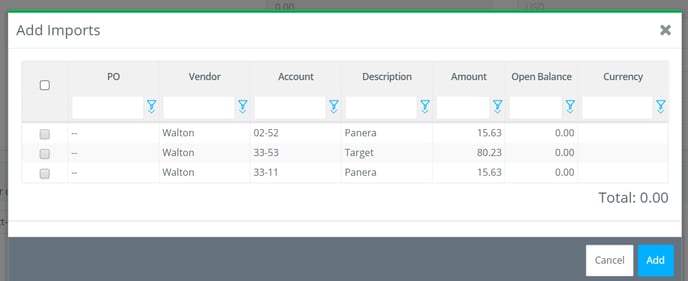
Step 4: Select the transactions in the Add Imports window then click ADD.

Step 5: Enter an envelope # or check the box to auto generate and enter a description.
.csv%20-%20Excel.png?width=688&height=183&name=2021-05-09%2019_57_27-Template%20(12).csv%20-%20Excel.png)
Step 6: Enter the total of the detail lines in the Reimburse Amount field. This will create a credit and a debit line automatically to move funds back to the PEX vendor's account.
.csv%20-%20Excel.png?width=688&height=439&name=2021-05-09%2019_59_44-Template%20(12).csv%20-%20Excel.png)
Step 7: Add notes and upload files as needed.

Step 8: Click SUBMIT.

Related Articles: How to: Use CASHét
How to: Set up a Prepaid Card Vendor
How to: Submit a Prepaid Card Envelope
How to: Approve a Prepaid Card Envelope
